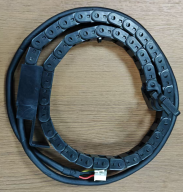
¶ Tool Head Cable
The tool head cable is a communication line that connects the MC board and the extruder adapter board. Any damage or poor contact of this cable will cause the machine to fail to operate normally.
¶ When to Replace
Replace it when it has been used for a certain number of years or when wire breakage occurs.
It may also need to be replaced if an "MCU" error appears during the printing process and the issue cannot be resolved even after a firmware update.
¶ Required Accessories and Tools
List of Accessories
|
.png)
|
.png)
|
List of Tools Used
.png) |
.png) |
.jpg) |
| H1.5mm Hexagon Socket Wrench | H2.5mm Hexagon Socket Wrench | H2.5mm Hexagon Socket Wrench |
¶ Warm Reminders
Before performing any maintenance work on the printer and electronic devices (including the cables on the printer), please turn off the printer power and disconnect the power connection to avoid short circuits that may cause additional damage to electronic devices and potential safety hazards.
When you perform maintenance or troubleshooting on the printer, please first check the temperatures of the hot end and the heated bed, and avoid operating when they are at high temperatures. If operation at high temperatures is unavoidable, please wear heat-insulating gloves to ensure the safe and effective execution of maintenance or troubleshooting work.
If you have any questions about this guide, please contact online technical support. We will reply promptly and provide you with the necessary assistance.
¶ Operation Guide
Step 1: Lift the Single-Nozzle Cover and Remove the Screws Securing the Tool Head Cable
Lift up to open the single-nozzle cover, disconnect the fan cable to remove the single-nozzle cover, then use an H1.5mm hexagon socket wrench to remove the four screws that secure the tool head cable.
.jpg) |
.jpg) |
.jpg) |
Step 2: Remove the PTFE Tube Clips and the Screws Securing the Cable Chain Mount
First, remove the four PTFE tube clips one by one, then cut off the cable ties that fasten the PTFE tube. After that, use an H2.5mm hexagon socket wrench to remove the two screws that secure the cable chain mount.
.jpg) |
.jpg) |
.jpg) |
|
Step 3: Remove the Air Filter Assembly and Take Off the Rear Cover Sheet Metal
First, remove the air filter assembly that is attached to it. Then, use an H2.0mm hexagon socket wrench to remove the eight screws that secure the rear cover sheet metal.
.jpg) |
.jpg) |
Step 4: Remove the Tool Head Cable
Unplug the terminal fixed on the MC main board (pinch the terminal clip to pull it out), then remove the cable along the cable management slot.
.jpg) |
.jpg) |
|
.jpg) |
.jpg) |
.jpg) |
Step 5: Install the New Tool Head Cable
First, secure the tool head cable with M2.5×6 screws. Then, fasten the nozzle cable clamp with BH2×6 screws. After that, use an H2.5mm hexagon socket wrench to firmly secure the cable chain mount with two screws.
.jpg) |
.jpg) |
.jpg) |
.jpg) |
||
¶ Step 6: Tuck the Cable into the Cable Management Slot
Organize the tool head cable along the cable management slot and handle it carefully during installation to avoid damaging the cable insulation.
.jpg) |
||
.jpg) |
.jpg) |
|
¶ Step 7: Plug in the Tool Head Cable and Install the Rear Cover Sheet Metal & Single-Nozzle Cover
First, plug the tool head cable into place. Then, use an H2.0mm hexagon socket wrench to fasten the eight screws of the rear cover sheet metal one by one. Finally, reinstall the single-nozzle cover (ensure the fan cable disconnected in Step 1 is reconnected before securing the cover to avoid functional issues)
.jpg) |
.jpg) |
.jpg) |
Step 8: Power On and Verify
Connect the power supply and turn on the printer. Then perform the following verifications:
- Check that the nozzle temperature is displayed normally on the main interface.
- Confirm that the detection result is normal in Expert Mode.
- Ensure no "MCU" error pop-up appears
.jpg) |
.jpg) |
.jpg) |